Skip to content
Your greenhouse plants are freezing. Winter heating bills drain your budget. You need reliable warmth that doesn’t cost a fortune.
Successful greenhouse heating combines 16 proven methods from free insulation tricks to advanced heating systems. Smart growers use multiple techniques together, reducing heating costs by 60% while maintaining perfect growing temperatures all winter long.
I have spent 29 years helping growers solve winter heating challenges across different climates. The most successful operations never rely on just one heating method. They combine free techniques with efficient systems to create reliable warmth at reasonable costs.
Don’t Miss:——Commercial Hydroponic Greenhouse Systems: How Do Design, Construction, and ROI Interconnect?
You might like:——What is a Smart Greenhouse? The Ultimate Guide to Automated Growing
What Is the Core of Greenhouse Warming: Heat Loss Prevention and Smart Storage?
Most growers waste money heating air that escapes immediately. They focus on adding more heat instead of keeping existing heat inside. This approach leads to massive energy waste.
The foundation of efficient greenhouse warming lies in two key principles: preventing heat loss through proper insulation systems and storing heat energy during peak periods. These methods can reduce heating requirements by 50-70% compared to basic heating alone.
In my experience designing greenhouse systems across 20+ countries, the most cost-effective heating starts with understanding where heat escapes. At CFGET, we always begin projects by identifying heat loss patterns before selecting heating equipment.
Understanding Commercial Insulation Systems
Commercial greenhouse insulation falls into two main categories that work together for maximum efficiency. Top insulation systems prevent rapid heat dissipation through the roof area, while four-sided insulation protects against heat loss through walls and ends.
Top insulation typically uses retractable thermal screens that deploy automatically based on temperature and light conditions. These screens can reduce heat loss by 35-50% during nighttime hours when temperatures drop most rapidly. The screens retract during daylight hours to allow maximum light transmission for plant growth.
| Insulation Type | Heat Loss Reduction | Energy Savings | Installation Cost | Payback Period |
|---|---|---|---|---|
| Top Thermal Screens | 35-50% | 30-45% | $2-4 per sq ft | 2-3 years |
| Side Wall Curtains | 20-35% | 15-25% | $1.50-3 per sq ft | 3-4 years |
| Double Layer Covering | 25-40% | 20-30% | $0.75-1.50 per sq ft | 1-2 years |
| Perimeter Insulation | 15-25% | 10-20% | $3-6 per sq ft | 4-6 years |
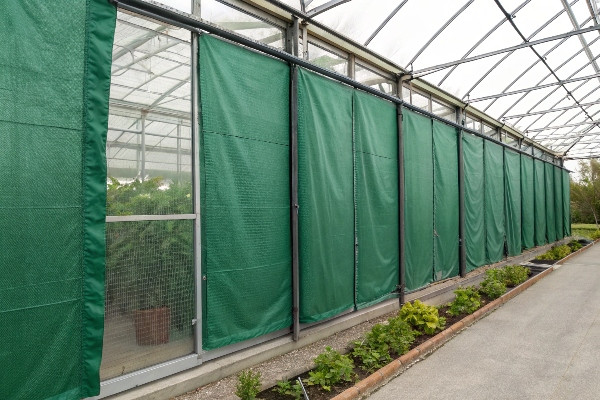
Four-sided insulation uses curtain systems along the walls and ends of the greenhouse. These curtains deploy during cold periods to create an insulation barrier between the growing space and the outside walls. The curtains can be manual or automated depending on your budget and operational needs.
I remember working on a project in Kazakhstan where winter temperatures reached -35°C. The facility was losing 70% of their heat through the roof and walls. We installed a complete top and side insulation system that reduced their heating costs by 65% in the first winter season. The payback period was just 18 months due to the extreme climate conditions.
Our CFGET greenhouse designs include additional features like external slopes that provide extra wind protection and insulation benefits. For film-type greenhouses, these slopes create a double-layer insulation effect that significantly improves thermal performance during cold periods.
Heat Storage Strategies for Consistent Temperatures
Heat storage works by capturing excess heat during warm periods and releasing it slowly during cold periods. This approach reduces the load on your primary heating system and provides more stable temperatures for plant growth.
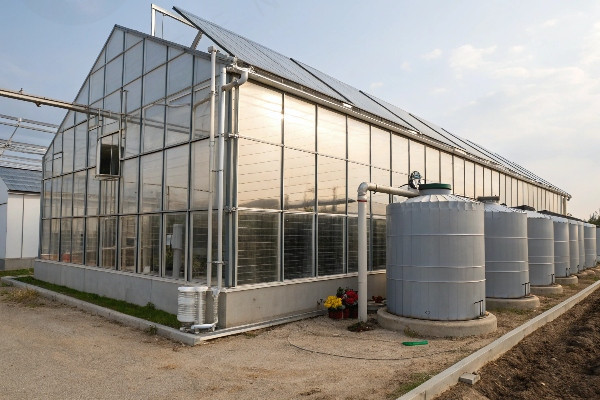
Thermal mass materials like water tanks, concrete floors, and stone walls absorb heat during the day and release it at night. The key is calculating the right amount of thermal mass for your greenhouse size and climate conditions. Too little mass provides insufficient storage, while too much mass takes up valuable growing space.
Phase change materials offer advanced heat storage in compact spaces. These materials absorb large amounts of heat when changing from solid to liquid state, then release the heat when temperatures drop. While more expensive than traditional thermal mass, they provide much higher storage capacity per unit of space.
I designed a heat storage system for a research facility in Canada that used a combination of water tanks and phase change materials. The system stored enough heat during sunny winter days to maintain growing temperatures for up to 48 hours without additional heating. This capability proved crucial during power outages and equipment maintenance periods.
How Can Small Greenhouse Owners Use DIY Insulation for Maximum Effect?
Small greenhouse owners often think professional insulation costs too much. They try random materials without understanding thermal properties. Most DIY attempts create condensation problems that damage plants.
Thermal blankets and rigid foam boards provide excellent insulation performance at DIY-friendly costs. When installed correctly with proper ventilation, these materials can reduce small greenhouse heating costs by 40-60% compared to uninsulated structures.
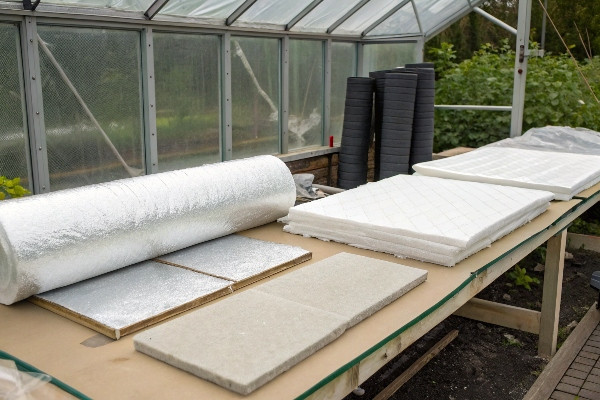
The secret to successful DIY insulation is selecting the right materials for your specific conditions and installing them properly to avoid moisture problems. I have guided hundreds of small-scale growers through this process with consistently positive results.
Thermal Blanket Installation Techniques
Thermal blankets work by creating dead air spaces that resist heat transfer. The most effective blankets combine reflective surfaces with insulating materials like bubble wrap or fiber fill. Installation timing and technique determine whether your blankets help or hurt your greenhouse environment.
Start installation during warm, dry conditions to minimize condensation issues. Begin at the highest point and work downward, ensuring each section overlaps properly to eliminate thermal bridges. Use clips or fasteners designed for greenhouse use that won’t damage covering materials.
Different blanket types work better in different situations. Reflective bubble wrap provides good insulation at low cost but may reduce light transmission more than other options. Multi-layer thermal curtains offer better insulation performance but cost more initially.
| Blanket Material | R-Value | Light Transmission | Moisture Resistance | Lifespan | Cost per sq ft |
|---|---|---|---|---|---|
| Single Bubble Wrap | 1.7 | 85% | Fair | 3-4 years | $0.35 |
| Double Bubble Wrap | 2.8 | 80% | Good | 4-5 years | $0.55 |
| Reflective Curtains | 3.5 | 75% | Excellent | 6-8 years | $1.25 |
| Multi-layer Thermal | 4.8 | 70% | Excellent | 8-12 years | $2.10 |
The key to avoiding condensation problems is maintaining some air circulation even when blankets are deployed. Small gaps at the bottom of blankets allow air movement while still providing significant insulation benefits. Automated systems can adjust blanket position based on temperature and humidity conditions.
I worked with a hobby grower in Michigan who was spending $300 per month heating a small greenhouse. We installed a double-layer bubble wrap system with proper ventilation that reduced his heating costs to $120 per month. The material cost was $180, so the payback period was less than 5 months.
Rigid Foam Board Applications
Rigid foam boards provide permanent insulation that doesn’t require daily adjustment like blanket systems. These boards work well for end walls, north walls, and foundation areas where you don’t need light transmission.
Installation requires careful attention to air sealing around edges and joints. Small gaps can create thermal bridges that significantly reduce insulation effectiveness. Use expanding foam sealant or specialized tapes to eliminate air leaks.
Different foam board types offer different advantages. Polyisocyanurate boards provide the highest R-value per inch but cost more than other options. Expanded polystyrene costs less but requires thicker installation for equivalent insulation performance.
The installation process involves cutting boards to fit your greenhouse frame, securing them with appropriate fasteners, and sealing all joints. Vapor barriers may be necessary in humid climates to prevent moisture problems behind the insulation.
I helped design a foam board system for a greenhouse in Thailand where high humidity made other insulation types impractical. We used closed-cell foam boards with integrated vapor barriers that provided excellent insulation without moisture problems. The system has performed well for over 5 years with minimal maintenance.
Ventilation Balance with Insulation
Many DIY insulation projects fail because they eliminate necessary air exchange. Your greenhouse needs controlled ventilation even during winter heating periods to prevent humidity buildup and maintain air quality for plant health.
Design your insulation system to work with adjustable ventilation. Automated vent controllers can open vents when humidity gets too high, then close them when temperatures drop. This balance maintains plant health while maximizing energy efficiency.
What Heating Solutions Work Best for Medium and Large Commercial Operations?
Medium and large greenhouses face different heating challenges than small hobby structures. Energy costs become major operating expenses. You need reliable systems that heat large spaces efficiently and consistently.
Hot air systems, geothermal heating, and solar integration provide the most reliable heating for commercial greenhouse operations. Each system offers specific advantages depending on your location, fuel availability, and crop requirements.
After installing heating systems across multiple continents, I can tell you that the best heating solution depends heavily on local conditions. Energy costs, fuel availability, and climate patterns all influence which system provides the best long-term value.
Hot Air Systems for Rapid Response Heating
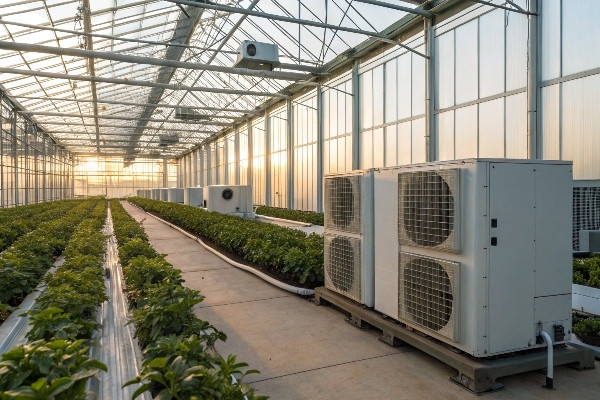
Hot air systems remain the most popular choice for commercial greenhouses because they provide fast temperature response and good air circulation. These systems heat air in a central unit and distribute it through ductwork or circulation fans throughout the growing space.
The main advantage of hot air systems is their ability to respond quickly to temperature changes. When outside temperatures drop suddenly, hot air systems can compensate within 10-15 minutes rather than the hours required by radiant systems. This quick response prevents plant stress during rapid weather changes.
Modern hot air systems include sophisticated controls that maintain precise temperature zones throughout large greenhouse spaces. Variable speed fans adjust air circulation based on heating demand, reducing energy consumption during mild weather periods.
| Fuel Type | BTU Output Range | Efficiency Rating | Initial Cost Range | Operating Cost | Maintenance Level |
|---|---|---|---|---|---|
| Natural Gas | 100k-1M BTU/hr | 85-95% | $5k-25k | Low | Low |
| Propane | 75k-800k BTU/hr | 80-92% | $4k-20k | Medium | Low |
| Oil | 100k-1.2M BTU/hr | 78-88% | $6k-30k | High | Medium |
| Electric | 50k-500k BTU/hr | 95-100% | $3k-15k | Very High | Very Low |
Natural gas systems offer the best combination of efficiency and operating costs where gas service is available. I installed a 500,000 BTU natural gas system for a vegetable producer in Netherlands that reduced their heating costs by 40% compared to their previous oil system. The improved efficiency also reduced their carbon footprint significantly.
Propane systems work well in areas without natural gas access. They provide similar performance characteristics with slightly higher fuel costs. The main advantage is fuel availability – propane delivery is available almost everywhere, making these systems practical for remote greenhouse locations.
Electric hot air systems have the highest operating costs but offer advantages in areas with low electricity rates or renewable energy sources. Solar panel integration can significantly reduce the operating costs of electric heating systems.
Geothermal Systems for Long-term Efficiency
Geothermal heating systems use the stable temperature of underground earth to provide efficient greenhouse heating. These systems require higher initial investment but offer the lowest operating costs over their 20+ year lifespan.
Ground temperatures remain constant year-round at depths below 8 feet. Geothermal systems extract this stable heat through buried loop systems and transfer it to your greenhouse using heat pumps or direct circulation methods.
The key to successful geothermal installation is proper ground loop sizing. You need sufficient loop length to extract adequate heat without freezing the ground around the pipes. Loop calculations depend on your heating load, soil type, local ground temperature, and system design.
I designed a geothermal system for a research facility in Alberta, Canada that operates efficiently even when outside temperatures reach -40°C. The system included 2,400 feet of ground loops buried 8 feet deep. Initial installation cost was $45,000, but annual heating costs are 65% lower than conventional systems. The payback period is 8 years, after which the facility enjoys very low heating costs.
Geothermal systems work especially well when combined with thermal storage. Excess heat capacity during mild weather can be stored in water tanks or other thermal mass for use during peak demand periods. This approach maximizes the efficiency of the geothermal system.
Solar Integration for Sustainable Operations
Solar heating systems can provide significant energy savings when designed as part of a complete heating strategy. Solar alone cannot meet all heating needs in most climates, but it can reduce conventional heating requirements by 30-60% during suitable weather conditions.
Active solar systems use collectors to heat water or air that circulates through your greenhouse. The heated medium transfers thermal energy to the growing space through radiant pipes, forced air systems, or thermal mass storage. Automated controls maximize solar collection when available and switch to backup heating when needed.
Passive solar design uses greenhouse orientation, thermal mass, and architectural features to capture and store solar energy naturally. South-facing orientation, proper roof angles, and thermal mass placement can provide significant heating benefits without additional equipment costs.
I worked on a project in Morocco where we integrated 200 square meters of solar collectors with 5,000 gallons of thermal storage. During sunny winter days, the system collected enough energy to provide heating for up to 72 hours during cloudy periods. The solar system reduced conventional heating costs by 55% while providing backup heating security.
Solar thermal storage is critical for effective solar heating systems. Water tanks, phase change materials, or underground thermal storage can hold solar energy collected during peak sun hours for use during cold nights and cloudy days.
How Can You Achieve Reliable Warmth Without Electricity or Conventional Fuels?
Power outages and fuel shortages can destroy valuable crops in hours. Remote locations often lack reliable electricity or gas service. You need heating methods that operate independently of external energy sources.
Passive solar design, thermal mass storage, biomass heating, and biological heat generation provide reliable greenhouse warmth without electricity or conventional fuels. These methods require careful planning but can maintain growing temperatures during extended utility outages.
The most resilient greenhouse operations I have designed combine multiple passive heating methods. Single-method approaches create vulnerability to weather changes or supply disruptions. Integrated passive systems provide reliable heating even during extended emergencies.
Passive Solar Design for Maximum Heat Capture
Passive solar heating begins with proper greenhouse orientation and design features that capture and store solar energy naturally. Your greenhouse should face true south (or north in southern hemisphere) to maximize winter sun exposure when heating needs are greatest.
Roof angle optimization is crucial for passive solar performance. The ideal angle equals your latitude plus 15 degrees to maximize solar gain during winter months when the sun is lower in the sky. This angle captures more solar energy when you need heating most while preventing overheating during summer months.
Thermal mass placement determines how effectively your greenhouse stores and releases solar energy. Water containers, concrete surfaces, and stone walls should be positioned to receive direct sunlight during winter days. Dark-colored surfaces absorb more solar energy than light colors.
| Thermal Mass Type | Heat Capacity | Cost Effectiveness | Installation Complexity | Space Efficiency |
|---|---|---|---|---|
| Water Barrels | 1 BTU/lb/°F | Excellent | Easy | Good |
| Concrete Blocks | 0.2 BTU/lb/°F | Good | Moderate | Fair |
| Stone Walls | 0.2 BTU/lb/°F | Fair | Difficult | Poor |
| Phase Change Materials | 50-80 BTU/lb | Poor | Easy | Excellent |
Water provides the highest heat storage capacity per pound, making it the most effective thermal mass for most applications. Black-painted water barrels placed along the north wall can store significant solar energy during the day and release it slowly at night. The key is using containers that can handle freeze-thaw cycles without cracking.
I designed a passive solar greenhouse for a mountain farm in Colorado where winter temperatures regularly drop below -20°F. The design included 500 gallons of water storage in black containers positioned to receive maximum winter sun. The thermal mass alone provided enough heat storage to maintain growing temperatures for 2-3 days during cloudy weather.
Concrete thermal mass works well when integrated into functional structures like growing benches or walkways. While concrete stores less heat per pound than water, it provides structural benefits and doesn’t require containers that might leak or freeze.
Biomass Heating for Renewable Independence
Biomass heating systems burn organic materials like wood, agricultural waste, or energy crops to provide greenhouse heating. Modern biomass systems burn much cleaner than traditional wood stoves while providing reliable heat output that can operate completely independently of external energy sources.
Automated biomass systems can maintain consistent temperatures with minimal daily attention. Auger feed systems move fuel from storage hoppers to the combustion chamber automatically. Temperature controls adjust feed rates to maintain desired greenhouse temperatures.
Fuel selection significantly impacts system performance and operating costs. Hardwood pellets provide consistent heat output and low ash production but cost more than other options. Agricultural waste like corn cobs or rice hulls may be available at low cost in farming areas.
I installed a biomass system for a greenhouse operation in rural Philippines that used rice hulls as primary fuel. Rice hulls were available as agricultural waste at essentially no cost. The automated system provided reliable heating for 8 months per year with just daily ash removal and weekly fuel loading.
Fuel storage is critical for biomass system success. You need covered storage that protects materials from moisture while allowing air circulation to prevent mold growth. Plan for at least 90 days of fuel storage to handle supply disruptions during winter months.
Biological Heat Generation Through Composting
Compost heating generates significant heat through natural decomposition processes. This method provides both heating benefits and valuable soil amendments. While heat output is less controllable than mechanical systems, composting can provide substantial heating for 3-6 months per pile.
Active compost piles generate temperatures between 120-160°F during peak decomposition periods. This heat can be captured through air circulation systems that draw warm air from the pile, or through water pipes running through the compost that heat water for radiant systems.
Proper compost management maintains heat output and prevents anaerobic conditions that reduce decomposition efficiency. The ideal carbon-to-nitrogen ratio is 25-30:1, with moisture content around 50-60%. Regular turning maintains oxygen levels and heat production.
I helped design a compost heating system for an organic farm in Vermont that used horse manure mixed with sawdust and agricultural waste. Three compost piles in rotation provided heating for a 30×60 foot greenhouse for 6 months per year. The system produced both heating and valuable compost for soil improvement.
Building effective compost piles requires understanding the decomposition process and proper pile construction. Piles should be 4-6 feet wide and 3-4 feet high for optimal heat generation. Smaller piles don’t generate enough heat, while larger piles can become anaerobic in the center.
Conclusion
Successful greenhouse heating combines multiple methods from free insulation techniques to efficient mechanical systems. The right combination can reduce costs by 60% while maintaining perfect growing conditions.